Table of Contents 📚
- Introduction
- Prerequisites
- Hyprland & Critical Softwares
- Basic Configuration
- Enhancing Your Hyprland Environment
- Theming, Look & feel
Introduction
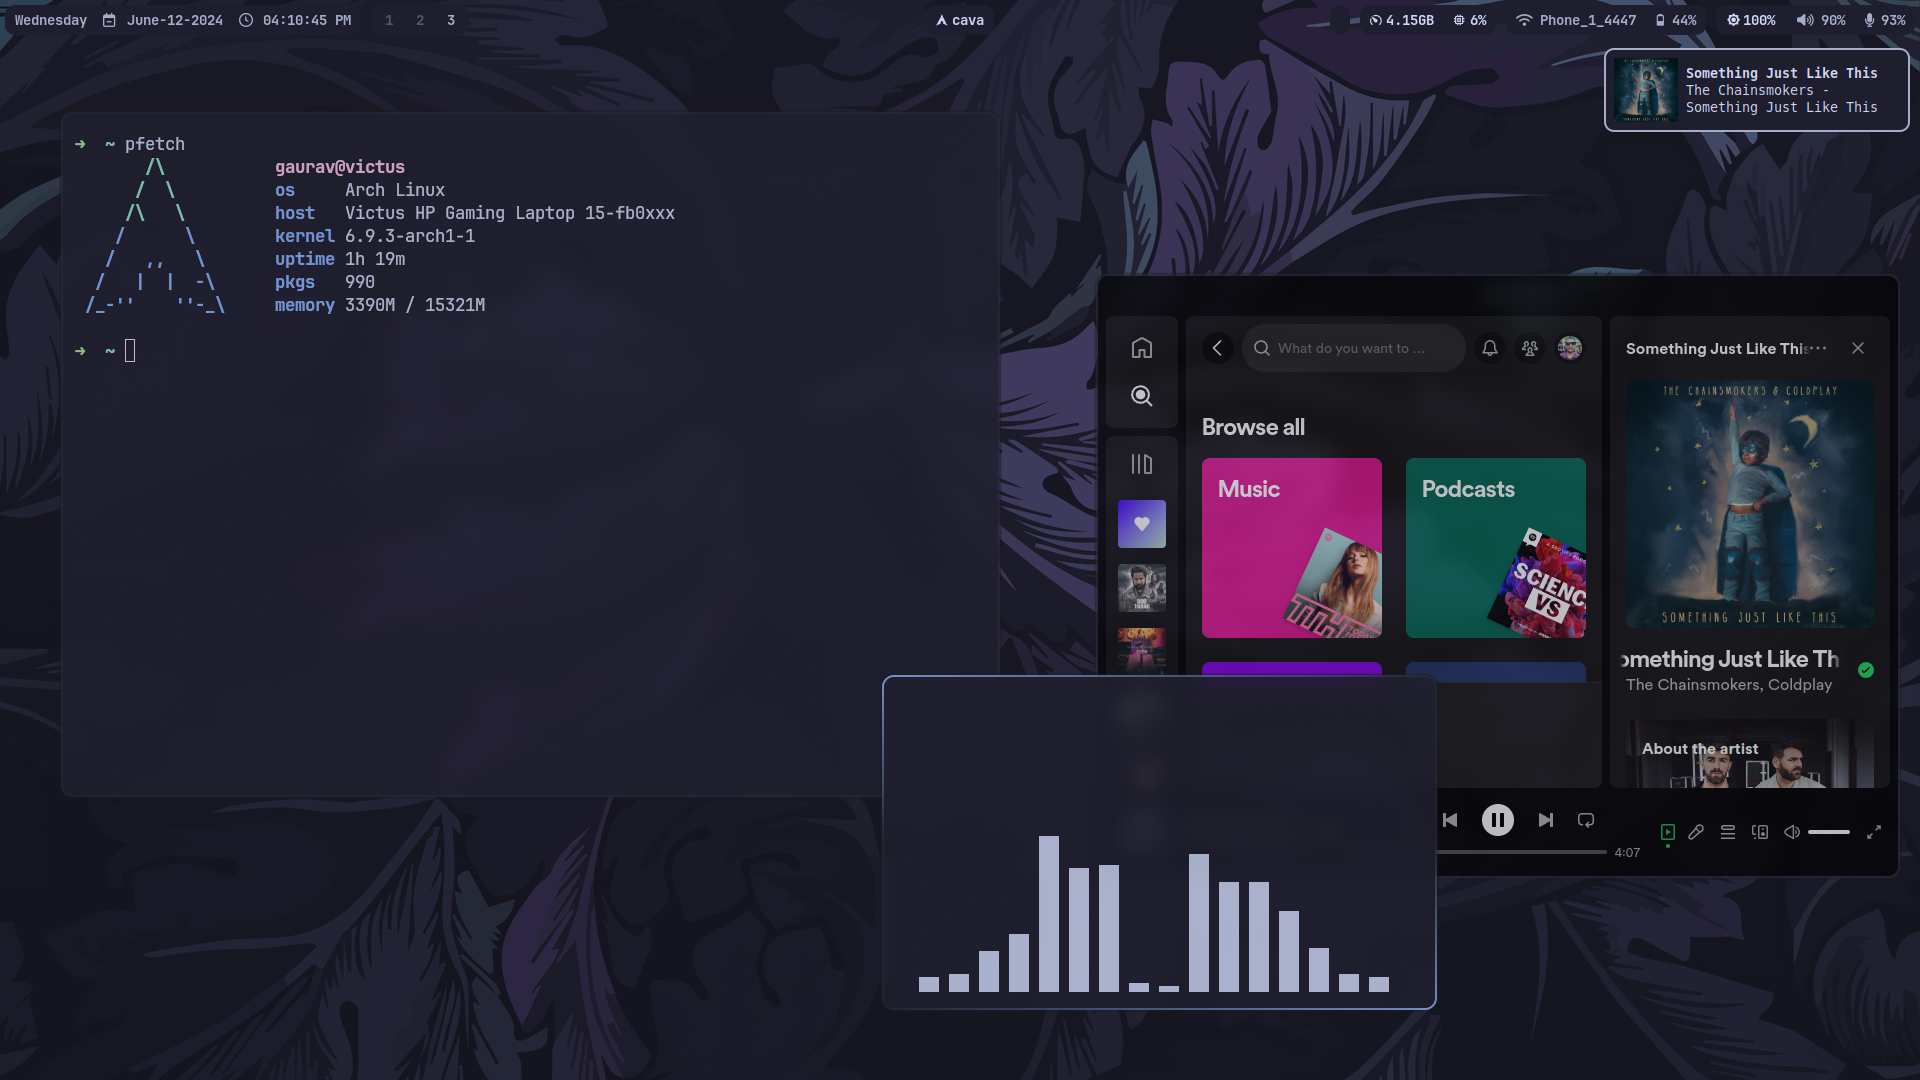
This guide will walk you through the Hyprland + Waybar configuration right after the installation of Arch Linux.
By the end of this guide, you'll have a clean and functional Hyprland setup like the one shown above.
Prerequisites 🚀
This guide assumes understanding of Linux systems, particularly Arch Linux. The following prerequisites are essential for the seamless installation and setup of Hyprland on your system.
Base System 💻
Arch Linux: A minimal Arch Linux Installation is required. It's assumed that you're well-versed with the Arch installation process and have a functional base system ready for Hyprland integration.
Toolbox Essentials 🧰
-
AUR Helper: An AUR helper s indispensable for efficient package management from the Arch User Repository. While the choice of helper is discretionary, I prefer yay due to its efficiency and user-friendliness.
sudo pacman -S --needed git base-devel && git clone https://aur.archlinux.org/yay.git && cd yay && makepkg -si # builds with makepkg -
Audio Stack: Install and configure Pipewire and Wireplumber for audio management. This modern audio setup will replace traditional systems like PulseAudio, providing better performance and flexibility.
sudo pacman -S pipewire wireplumber -
Nerd Fonts: Install these Nerd Fonts for enhanced glyph support and aesthetics:
- Cascadia Code
- JetBrains Mono
- Fira Code
- Iosevka
- Noto
- Nerd Font Symbols
sudo pacman -S ttf-cascadia-code-nerd ttf-cascadia-mono-nerd ttf-fira-code ttf-fira-mono ttf-fira-sans ttf-firacode-nerd ttf-iosevka-nerd ttf-iosevkaterm-nerd ttf-jetbrains-mono-nerd ttf-jetbrains-mono ttf-nerd-fonts-symbols ttf-nerd-fonts-symbols ttf-nerd-fonts-symbols-mono -
Display Manager: SDDM is the recommended display manager due to its high compatibility with Hyprland. However, feel free to use your preferred display manager, understanding that some configuration adjustments may be necessary.
sudo pacman -S sddm systemctl enable sddm.service -
Web Browser: Brave Brave will be used for accessing configuration resources and this guide. Install via:
yay -S brave-bin -
Terminal Emulator: Kitty is the default terminal in the Hyprland configuration. If you prefer an alternative, be prepared to modify the config accordingly.
sudo pacman -S kitty -
Text/Code Editor: Any text editor or IDE will suffice. This guide will use Visual Studio Code and nano for ease of demonstration, but feel free to use your editor of choice (vim, emacs, etc.).
yay -S visual-studio-code-bin sudo pacman -S nano -
tar: The tar command is a utility for archiving and extracting files. It will be essential for managing various archives throughout the installation process.
sudo pacman -S tar
Assumed Competencies by This Point 🧠
-
Basic Linux Command Line Knowledge: You'll be spending some quality time in the terminal, so make sure you're comfortable with the command line.
-
Package Management: Understanding how to install and manage packages using pacman and an AUR helper is a must.
-
Configuration Editing: Ability to edit configuration files using a text editor, including understanding basic syntax and structure.
-
Troubleshooting: Some hiccups may occur along the way, so basic troubleshooting skills will come in handy.
Additional Recommendations 📌
-
Backup Your Data: Ensure you have backups of any important data before proceeding.
-
Update Your System: Keep your system up to date before starting the installation to avoid any potential conflicts.
To update your system, run:
sudo pacman -Syy
sudo pacman -Syu
Hyprland & Critical Softwares 🖥️🔧
With the prerequisite base system established, we proceed to the core of this guide. This section delineates the process of installing Hyprland and configuring critical system software to ensure a robust and efficient workflow.
Hyprland Installation 🚀
-
Install Hyprland:
sudo pacman -S hyprlandPro Tip:💡 If you're feeling adventurous, you can always grab the bleeding-edge version from the AUR for the latest features and fixes.
-
Initiate Hyprland: As we installed SDDM before, you can also start the session through it.
Hyprland -
Upon initial launch: A top bar will display with a warning and commands to launch Kitty and exit Hyprland. To remove the warning ⚠️:
- Launch Kitty using the shortcut
(SUPER + Q) - Navigate to
~/.config/hypr/hyprland.confand either comment out or remove the lineautogenerated = 1.
Essential default keybindings:
SUPER + C: Kill the active windowSUPER + M: Quit hyprland (but why would you want to?)
- Launch Kitty using the shortcut
To access web resources, open Kitty and execute brave-browser to launch the Brave browser.
Critical System Components 🛠️
-
XDG Desktop Portal: The XDG Desktop Portal is crucial for handling desktop functionalities such as file dialogs and screensharing.
sudo pacman -S xdg-desktop-portal-hyprland -
Install Polkit: Polkit manages system-wide privileges. Install the KDE version for compatibility:
sudo pacman -S polkit-kde-agent-
To autostart Polkit, append the following to your
hyprland.conf:exec-once=/usr/lib/polkit-kde-authentication-agent-1 -
Note: Ensure there's no whitespace between
=and/.
-
-
QT Wayland Support: Install the necessary libraries for QT applications to function correctly under Wayland:
sudo pacman -S qt5-wayland qt6-wayland -
Notification Daemon: A notification daemon is essential for managing system notifications. Many apps may freeze without one running. Dunst is a lightweight, customizable option:
sudo pacman -S dunst-
To autostart dunst, append the following to your
hyprland.conf:exec-once=/usr/bin/dunst
-
Hyprland Session Reload 🔄
After installing the critical software components and making the necessary configurations, restart your Hyprland session to ensure all new settings and software are properly initialized and integrated.
Basic Configuration 🛠️
Having installed Hyprland and essential system components, we now proceed to configure basics of your environment for optimal functionality and efficiency. This section will guide you through the configuration of key aspects by modifying the hyprland.conf file.
Navigate to your configuration file and commence editing.
1. Monitor Configuration 🖥️
The default monitor configuration is optimized for most setups. However, for advanced configurations such as setting precise refresh rates, resolutions, or mirroring displays, refer to the Hyprland Monitor Configuration Wiki.
2. User Programs 📚
Define frequently used applications for rapid access:
# Define primary applications
$terminal = kitty
$fileManager = dolphin
$browser = brave-browser
$editor = code
3. Autostart Configuration 🚀
Autostart critical applications and services. We have previously configured Polkit and dunst daemon for autostart.
## Autostart essential processes
exec-once=/usr/lib/polkit-kde-authentication-agent-1 # Polkit for privilege management
exec-once=/usr/bin/dunst
# Additional autostart entries
4. Environment Variables 🌍
Configure environment variables to ensure compatibility and performance. You can copy and paste these as it is, as anyway you will need to configure them later.
# QT
env = QT_QPA_PLATFORM,wayland;xcb
env = QT_QPA_PLATFORMTHEME,qt6ct
env = QT_WAYLAND_DISABLE_WINDOWDECORATION,1
env = QT_AUTO_SCREEN_SCALE_FACTOR,1
env = QT_STYLE_OVERRIDE,kvantum

# Toolkit Backend Variables
env = GDK_BACKEND,wayland,x11,*
env = SDL_VIDEODRIVER,wayland
env = CLUTTER_BACKEND,wayland

# XDG Specifications
env = XDG_CURRENT_DESKTOP,Hyprland
env = XDG_SESSION_TYPE,wayland
env = XDG_SESSION_DESKTOP,Hyprland
5. Look and Feel 🎨
Adjust the appearance and behavior of your Hyprland environment. Detailed customization will be covered in subsequent sections.
Change things like gaps_in, gaps_out, border_size, resizing_on_border, etc. according to your comfort.
general {
    gaps_in = 5
    gaps_out = 5
    border_size = 2
    col.active_border = rgb(8aadf4) rgb(24273A) rgb(24273A) rgb(8aadf4) 45deg
    col.inactive_border = rgb(24273A) rgb(24273A) rgb(24273A) rgb(27273A) 45deg
    resize_on_border = true
    allow_tearing = false
    layout = dwindle
}
6. Input Configuration ⌨️🖱️
Configure input devices, including keyboard layouts and touchpad settings:
Most of the defaults will work, but you might want to change things like natural_scroll, workspace_swipe, etc.
input {
    kb_layout = us
    follow_mouse = 1
    sensitivity = 0

    touchpad {
        natural_scroll = true
    }
}

gestures {
    workspace_swipe = true
    workspace_swipe_fingers = 3
}
7. Keybindings ⌨️
Configure keybindings for efficient workflow management. Note that these bindings are crucial as we haven't yet configured an application launcher.
Pro Tip: 💡 Try to make meaningful binds like T for terminal, B for browser, C for code, F for file manager, and Q for quit.
You might want to change the volume and brightness of your system. To do that, install the following software:
# Brightness control
sudo pacman -S brightnessctl

# Volume control
sudo pacman -S pamixer
After installing the utilities, add the following bindings:
$mainMod = SUPER

bind = $mainMod, T, exec, $terminal
bind = $mainMod, B, exec, $browser
bind = $mainMod, C, exec, $editor
bind = $mainMod, Q, killactive,
bind = $mainMod, M, exit,
bind = $mainMod, F, exec, $fileManager
bind = $mainMod, W, togglefloating,


# Volume and Media Control
bind = , XF86AudioRaiseVolume, exec, pamixer -i 5
bind = , XF86AudioLowerVolume, exec, pamixer -d 5
bind = , XF86AudioMicMute, exec, pamixer --default-source -m
bind = , XF86AudioMute, exec, pamixer -t
bind = , XF86AudioPlay, exec, playerctl play-pause
bind = , XF86AudioPause, exec, playerctl play-pause
bind = , XF86AudioNext, exec, playerctl next
bind = , XF86AudioPrev, exec, playerctl previous

# Screen brightness
bind = , XF86MonBrightnessUp, exec, brightnessctl s +5%
bind = , XF86MonBrightnessDown, exec, brightnessctl s 5%-
We will add more binds as we progress.
For comprehensive keybinding documentation, refer to the Hyprland Keybindings Wiki.
With your minimal Hyprland environment now operational, we're poised to elevate it from functional to phenomenal. In the following sections, we'll supercharge your setup with sleek status bars, lightning-fast application launchers, and dynamic wallpaper utilities. Brace yourself for a deep dive into advanced customization that will transform your desktop into a powerhouse of aesthetics and efficiency. The groundwork is laid; now it's time to unleash the full potential of your Hyprland environment. 🚀✨
Enhancing Your Hyprland Environment 🚀✨
This section guides you through the installation and configuration of essential utilities that will elevate your Hyprland experience, augmenting both functionality and aesthetics. We'll cover status bars, application launchers, clipboard managers, and more, providing concise configuration snippets directly from my setup.
Pro Tip: 💡 In your hyprland.conf, organize similar configurations together, such as variables, exec-once statements, and keybindings, for better readability and maintainability.
Status Bar: Waybar 📊
Waybar provides real-time system information at a glance, ensuring you stay informed about your system's status.
Installation
sudo pacman -S waybar
Configuration
Customize the appearance and behavior of the status bar by modifying the following files:
~/.config/waybar/config.jsonc- Format and structure the bar.~/.config/waybar/style.css- Style and theme the bar.
It will use some default configuration, you can copy this repo's configuration files:
cp -r ~/simple-hyprland/configs/waybar ~/.config/
Note: 📝 Note: Remember to reload the bar to apply any configuration changes.
Hypr
Add the following keybinding to reload the bar:
bind = Ctrl, Escape, exec, killall waybar || waybar
Autostart the bar with:
exec-once=waybar
App Launcher: Tofi 🚀
Tofi offers a minimalistic, Wayland-native application launcher for efficient application access.
From all the launchers available, I found Tofi to be the most efficient and minimalistic.
(Note: Everything in the following sections can also be configured with any other launcher of your choice.)
Installation
yay -S tofi
Configuration
Customize the appearance and behavior of the launcher by modifying the configuration file:
~/.config/tofi/ - The configuration directory.
You can copy this repo's pre-configured files:
cp -r ~/simple-hyprland/configs/tofi ~/.config/
Hypr
Keybinding to launch the application menu:
bind = $mainMod, A, exec, $menu
Define the launcher command and configuration path:
$menu = tofi-drun -c ~/.config/tofi/configA --drun-launch=true
Clipboard Manager: Cliphist 📋
Cliphist enables you to keep track of your clipboard history, enhancing productivity when working with multiple pieces of information.
Installation
To install cliphist, use the following command:
sudo pacman -S cliphist
Configuration
No specific configuration is needed.
Hypr
Keybinding to access the clipboard history:
bind = SUPER, V, exec, cliphist list | tofi -c ~/.config/tofi/configV | cliphist decode | wl-copy
Autostart the clipboard manager:
exec-once = wl-paste --type text --watch cliphist store
exec-once = wl-paste --type image --watch cliphist store
Wallpaper: Swww 🖼️
Swww allows you to set and manage your desktop background, enhancing the visual appeal of your workspace.
Installation
To install swww, use the following command:
yay -S swww
Configuration
Copy sample wallpapers (creates the assets folder inside .config):
cp -r ~/simple-hyprland/assets/backgrounds ~/.config/assets/backgrounds/
No specific configuration is needed.
Hypr
Initialize the wallpaper daemon and set a wallpaper on startup:
exec-once = swww-daemon
exec-once = swww img ~/.config/assets/backgrounds/cat_leaves.png  --transition-fps 255 --transition-type outer --transition-duration 0.8
You can also set the keybinding to change the wallpaper :
bind = SUPER, N, exec, swww img ~/.config/assets/backgrounds/dark-cat-rosewater.png --transition-fps 255 --transition-type outer --transition-duration 0.8 # Change wallpaper
Color Picker: Hyprpicker 🎨
Hyprpicker allows you to select colors directly from your screen, a handy tool for design and development tasks.
Installation
yay -S hyprpicker
Configuration
No specific configuration is needed for hyprpicker.
Hypr
Define a variable for the color picker and a keybinding to launch it:
$colorPicker = hyprpicker
bind = SUPER, P, exec, $colorPicker | wl-copy # Also copies to clipboard
Screen Locker: Hyprlock 🔒
A screen locker secures your computer when you are away, preventing unauthorized access.
Installation
Install hyprlock, which is designed to work well with Hyprland.
yay -S hyprlock
Configuration
Customize the screen locker by modifying the configuration file: ~/.config/hypr/hyprlock.conf
You can copy this repo's configuration file:
cp ~/simple-hyprland/configs/hypr/hyprlock.conf ~/.config/hypr/
Hypr
Keybinding to lock the desktop:
bind = SUPER, L, exec, hyprlock
Idle Manager: Hypridle ⏳
Hypridle automatically locks your screen or takes other actions when your system is idle, enhancing security and power management.
Installation
To install hypridle, use the following command:
yay -S hypridle
Configuration
Customize the idle manager behavior by modifying the configuration file: ~/.config/hypr/hypridle.conf
You can copy this repo's configuration file:
cp ~/simple-hyprland/configs/hypr/hypridle.conf ~/.config/hypr/
Hypr
No specific keybindings or variables are needed for hypridle.
Autostart the idle manager:
exec-once = hypridle
Logout Menu: Wlogout 🚪
Wlogout provides a convenient way to log out, restart, or shut down your system.
Installation
yay -S wlogout
Configuration
Customize the appearance and behavior of the logout menu by modifying the following files:
~/.config/wlogout/layout- Format and structure the menu.~/.config/wlogout/style.css- Style and theme the menu.
I will use some default configuration from this repo:
cp -r ~/simple-hyprland/configs/wlogout ~/.config/
cp -r ~/simple-hyprland/assets/wlogout ~/.config/assets/ # copying assets
Hypr
Keybinding to launch the logout menu:
bind = SUPER, ESCAPE, exec, wlogout
Taking Screenshots: Grimblast 📸
Grimblast is a script that wraps around grim and slurp, providing enhanced functionality for capturing screenshots.
Installation
yay -S grimblast
Configuration
No specific configuration is needed for grimblast.
Hypr
Keybindings for capturing screenshots:
# add --cursor flag to include cursor also, --freeze flag to freeze before selection

# Entire screen + clipboard copy
bind = , Print, exec, grimblast --notify copysave screen

# current Active window only + clipboard copy
bind = SUPER, Print, exec, grimblast --notify copysave active

# Select area to take screenshot
bind = SUPER ALT, Print, exec, grimblast --notify copysave area
With these utilities configured, your Hyprland environment now boasts enhanced functionality, aesthetics, and user experience, tailored to your preferences and workflow. 🎉✨
Theming, Look & feel 🎨✨
In this guide, we'll transform your Hyprland setup into a visually stunning environment by applying themes to various components. A well-themed desktop not only looks great but also enhances your workflow and overall user experience.
Installing Essential Tools 🛠️
nwg-look
nwg-look simplifies the process of setting GTK themes, enabling a cohesive look across different toolkits.
Installation
sudo pacman -S nwg-look
qt5ct, qt6ct, Kvantum
These tools are essential for managing and applying themes to QT5 and QT6 applications, ensuring a consistent appearance across your desktop environment.
Installation
sudo pacman -S qt5ct qt6ct kvantum
Adding QT Environment Variables
We've already added the necessary QT environment variables during the basic configuration step.
Installing themes and icons 🏞️
GTK Themes
Place the themes in the system theme directory. For this guide, we'll install the Catppuccin theme taken from hyprdots repo, a visually appealing option.
Extract the theme from this repo's assets to the following location to apply it system-wide:
tar -xvf ~/simple-hyprland/assets/themes/Catppuccin-Mocha.tar.xz -C /usr/share/themes/
Icon Theme
From that same repo place the icon theme in the system icon directory. We'll install the Tela icon theme also from hyprdots.
Extract the theme from our assets to the following location to apply it system-wide:
tar -xvf ~/simple-hyprland/assets/icons/Tela-circle-dracula.tar.xz -C /usr/share/icons/
Kvantum Theme
For Arch-based systems, install the kvantum-theme-catppuccin from the AUR:
yay -S kvantum-theme-catppuccin-git
Setting the Themes 🖼️
- Use
nwg-lookto set the global GTK and icon theme, and apply the changes. - Open the
kvantummanager(with sudo to apply as root theme , "sudo -E kvantummanager"), select the desired theme, and apply it. - Open the
qt6ct(QT6 Settings) and set the icon theme. - Optionally, you can change other settings like font size, cursor theme, etc.
By default all the configs we used in the previous tutorial are configured with catppuccin color theme.
Theming applications 🖥️
At this stage, you might want to theme specific applications to achieve a uniform look across your desktop environment.
1. Kitty: The terminal emulator
Copy the configuration files for the Catppuccin theme:
kitty.conf- Kitty configuration filetheme.conf- Theme file
cp -r ~/simple-hyprland/configs/kitty ~/.config/
2. VS Code: The Code editor
Install the Catppuccin theme extension from the Visual Studio Code Marketplace.
3. Dunst: Notification daemon
Copy the configuration file i.e. dunstrc.
cp -r ~/simple-hyprland/configs/dunst ~/.config/
Misc 🔧
Some additional enhancements to elevate the overall feel and experience.
1. Adding blur to the windows
We can achieve a blurred effect on windows by adding window rules in our hyprland.conf.
Example: To add blur to Kitty, add:
windowrulev2 = opacity 0.90 0.90,class:^(kitty)$
Pro Tip: 💡 To get the class_name for a specific window, use the command hyprctl clients while the window is open.
For more details refer Hyprland Window Rules.
2. Adding Animation and decorations
Animations and decorations can add a touch of flair to your desktop experience.
Add/Edit the following to yourhyprland.conf.
animations {
    enabled = true
    bezier = wind, 0.05, 0.9, 0.1, 1.05
    bezier = winIn, 0.1, 1.1, 0.1, 1.1
    bezier = winOut, 0.3, -0.3, 0, 1
    bezier = liner, 1, 1, 1, 1
    animation = windows, 1, 6, wind, slide
    animation = windowsIn, 1, 6, winIn, slide
    animation = windowsOut, 1, 5, winOut, slide
    animation = windowsMove, 1, 5, wind, slide
    animation = border, 1, 1, liner
    animation = borderangle, 1, 30, liner, loop
    animation = fade, 1, 10, default
    animation = workspaces, 1, 5, wind
}

decoration {
    rounding = 10

    # Change transparency of focused and unfocused windows
    active_opacity = 1.0
    inactive_opacity = 1.0

    drop_shadow = true
    shadow_range = 4
    shadow_render_power = 3
    col.shadow = rgba(1a1a1aee)

    blur {
        enabled = true
        size = 3
        passes = 3
        new_optimizations = true
        vibrancy = 0.1696
        ignore_opacity = true
    }
}
With these steps, you'll have a visually stunning and cohesive desktop environment tailored to your preferences. Remember, the true beauty of a desktop lies in the eye of the beholder, so feel free to experiment and find the perfect combination that resonates with your personal style. Immerse yourself in an aesthetic experience that not only delights the senses but also enhances your productivity and workflow. 🌟🖥️✨